
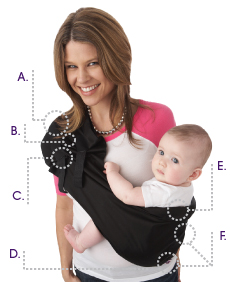
Anatomy of the Adjustable AP
- Wide Shoulder Design - Shoulder covered by pouch.
- Red Arrow - Located on inside of pouch next to caution label.
- Buckle & Strap - Two buckles with straps infinitely adjust to give you the best
Hotslings fit. - Good Fit Zone - Pouch should sit at belly button or slightly below.
- Sleek Padding - Pouch is lightly padded on both sides for structure in the semi-reclined carry & added comfort in the hip carry.
- Seam & "hs" Tag - Where pouch is sewn together. Use tag to align pouch & find best fit.
Adjusting the Adjustable AP

- Adjust your pouch before putting baby in. Out of the package, the Hotslings AP fits the largest in our caregiver size range. To make the pouch smaller, pull the straps through the buckles.
- While holding the buckle, pull each strap equally to tighten the pouch to desired tightness. Without baby in sling, check for correct fit by placing the pouch on your shoulder (red arrow against your body, pointing toward your neck). The "hs" tag should be at the top of your hip bone or approximately 3 inches below your belly button.
- Place baby carefully in pouch according to the directions below.
- If pouch feels comfortable at this size, you are ready to go. If pouch is too loose or too tight, take baby out of pouch and adjust slightly by pulling the straps through the buckles until you have a good fit.
- Baby should be high and tight with the lowest part of the pouch near your belly button. If pouch is fully extended or fully collapsed and does not fit, please contact customer service for a solution.
Semi-Reclined Carry - 8 lbs - 4 Months
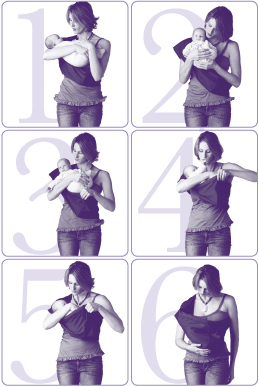
- Put pouch on shoulder. Line up "hs" tag under breast opposite wearing shoulder. Hold baby in arm of "wearing shoulder" & cross baby's feet.
- Open the outer edge of the pouch so it clears the baby's bottom. Line up the seam with the baby's bottom.
- Lower him bottom first, sliding his back down your front. Baby's feet will be crossed & on top of his body.
- Use arm to support baby's head as you slide baby down into the pouch. Baby should be between the two layers of fabric.
- Do not put baby's head in until baby's bottom is all the way at the bottom of the sling. Now cradle his head with the side of the sling.
- Baby should sit semi-reclined. Baby's chin should not be pressed against his chest. Regularly monitor your baby's breathing while in this position.
Front Carry - 2 - 8 Months
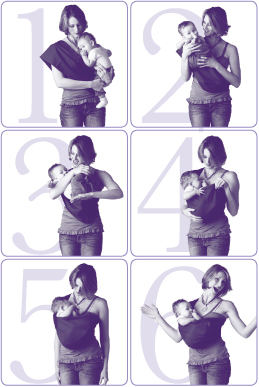
- Put pouch on desired shoulder. Line up "hs" tag under breast opposite "wearing shoulder." This position is for babies with full head & neck control.
- Hold baby high up on your chest, her back to your front, slightly facing sideways (away from "wearing shoulder").
- Find the pouch opening. Cross baby's legs & put them on top of baby's body. Grad "padding."
- Lower baby's bottom into the pouch. Baby should be between the two layers of fabric. The seam should be in front of baby.
- Baby's weight should be tipped toward you & resting back against your body. Baby may be facing forward or sideways.
- Check to make sure baby's bottom & legs are between fabric layers. Baby's arms can be in or out. Head support should not be necessary at this stage.
Hip Carry - 6 - 8 Months & Up
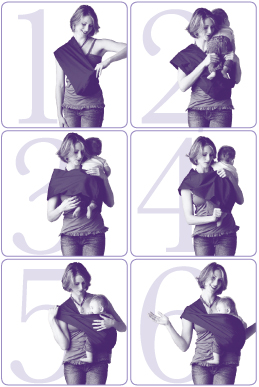
- Put pouch on desired shoulder. Line up "hs" tag under breast opposite "wearing shoulder."
- Hold baby with his tummy on your shoulder opposite "wearing shoulder."
- Put baby's feet all the way through. Make sure the "seam" is in line with baby's spine.
- Open folds of pouch to make a seat. Drop baby into seat by lowering baby's bottom between layers of fabric.
- Bottom "padding" should be under baby's bent knees & can be pulled up over baby's back.
- Baby's bent legs should straddle your waist & his bottom should be below his knees. Periodically bend baby's knees to keep baby's legs comfortable.
Download the Adjustable AP Instruction Booklet
(click the image below to download a PDF version of the booklet)
